How to Recover Overwritten Files on Windows?
Have you ever accidentally overwritten an important file on your Windows computer or external drive? It can be frustrating to lose your work but don’t worry, all hope is not lost! In this blog post, we’ll go over the steps you can take to recover overwritten files on Windows.
Contents
Is it possible to recover overwritten files on Windows?
How to Recover Overwritten Files on Windows?
How to Prevent File Overwrites?
Conclusion
Is it possible to recover overwritten files on Windows?
Before we dive in, it’s important to note that the success of recovering overwritten files depends on various factors. For example, if the file has been overwritten multiple times or if the space where it was stored has been reused, it may be impossible to recover the file. However, in many cases, it’s possible to recover overwritten files with the right tools and techniques.
How to Recover Overwritten Files on Windows?
Step 1: Stop Using the Drive
The first thing you should do when you realize you’ve overwritten a file is to stop using the drive where the file was stored. When you delete a file, it’s not actually erased from the drive, but rather, the space it occupied is marked as available for new data to be written. If you continue to use the drive, you risk overwriting the file again and making it more difficult to recover.
Step 2: Check the Recycle Bin
The next step is to check the Recycle Bin. If the file was deleted, it may still be in the Recycle Bin. To check, simply double-click on the Recycle Bin icon on your desktop. If you find the file, right-click on it and select “Restore” to recover it.
Step 3: Use File History
If you have enabled File History on your Windows computer, you may be able to recover an earlier version of the file. File History is a built-in backup feature in Windows that automatically backs up files in designated folders. To use File History, follow these steps:
-
Open the folder where the file was stored.
-
Click on the “History” button in the ribbon at the top of the window.
-
Select the version of the file you want to restore.
-
Click the “Restore” button.
Step 4: Use Previous Versions
If you don’t have File History enabled, you may still be able to recover an earlier version of the file using the Previous Versions feature. This feature takes periodic snapshots of the files on your computer, allowing you to restore an earlier version of a file. To use Previous Versions, follow these steps:
-
Right-click on the folder that contained the file and select “Properties.”
-
Click on the “Previous Versions” tab.
-
Select the version of the file you want to restore.
-
Click the “Restore” button.
Step 5: Use Data Recovery Software
If the above steps don’t work, or if you’ve accidentally overwritten a file multiple times, you may need to use data recovery software to recover the file. Data recovery software is designed to scan your hard drive for deleted or lost files and restore them.
There are many data recovery software options available, both free and paid.
 RecoverXData is a software application designed to recover lost or deleted data from various storage devices such as hard drives, USB drives, memory cards, and other types of removable media. It uses advanced algorithms to scan the storage device and locate the lost or deleted files, which can then be restored to their original location or a new location.
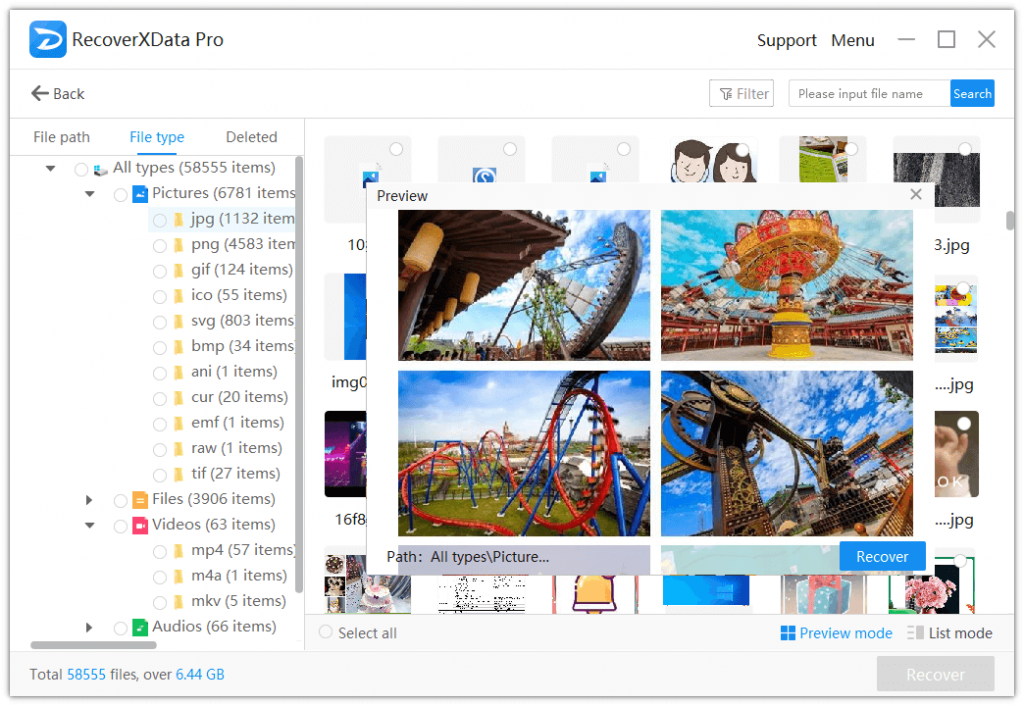
RecoverXData can recover a wide range of file types, including documents, photos, videos, audio files, emails, and archives. It supports various file systems such as NTFS, FAT32, exFAT, and HFS+. The software is easy to use and provides a user-friendly interface that guides the user through the recovery process.
RecoverXData is a useful tool for individuals or businesses that have accidentally deleted important files or experienced data loss due to various reasons such as hardware failure, virus attacks, system crashes, or human error.

To use data recovery software, follow these steps:
-
Download and install the data recovery software from the download button above.
-
Launch the software and select the mode and drive where the file was stored.
-
Scan the drive for deleted or lost files.
-
Select the file you want to recover and click the “Recover” button.
Step 6: Use a Professional Data Recovery Service
If none of the above steps work, or if the file is extremely important and you can’t risk losing it, you may need to use a professional data recovery service. These services specialize in recovering lost or damaged data and have specialized tools and techniques to recover even the most difficult files.
Professional data recovery services can be expensive, but they’re often worth the cost if the data is critical.
To use a professional data recovery service, follow these steps:
-
Research and choose a reputable data recovery service. Some popular options include Ontrack, DriveSavers, and Data Recovery Group.
-
Contact the data recovery service and provide them with information about the file you’re trying to recover and the circumstances surrounding its loss.
-
Send your hard drive or storage device to the data recovery service. They’ll perform an evaluation to determine if the file can be recovered and provide you with a quote for the cost of the recovery.
-
If you agree to the quote, the data recovery service will begin the recovery process. Depending on the complexity of the recovery, this can take anywhere from a few days to several weeks.
-
Once the recovery is complete, the data recovery service will provide you with the recovered data. Be sure to back up the data in multiple locations to prevent future loss.
How to Prevent File Overwrites?
Of course, the best way to deal with file overwrites is to prevent them from happening in the first place. Here are a few tips to help you avoid overwriting important files:
-
Make regular backups of your data. This will ensure that even if you accidentally overwrite a file, you’ll still have a copy of it.
-
Use version control software, such as Git or SVN, for code and document files. This will allow you to easily revert to earlier versions of files.
-
Use cloud storage services, such as Google Drive or Dropbox, to store important files. This will ensure that even if your local hard drive is damaged or lost, you’ll still have a copy of the file.
-
Be careful when moving or copying files. Make sure you’re not accidentally overwriting existing files with new ones.
-
Enable the “confirm file replace” option in Windows. This will prompt you to confirm that you want to overwrite a file before doing so.
Conclusion
Accidentally overwriting an important file can be frustrating, but with the right tools and techniques, it’s often possible to recover the file. By following the steps outlined in this blog post, you can increase your chances of successfully recovering overwritten files on your Windows computer. And remember, prevention is the best cure, so take steps to avoid file overwrites in the future.
The earlier the data is scanned, the more data will be recovered.
Recover Now (No Ratings Yet)
- Data loss can be a significant problem for anyone, regardless of whether you're a business professional or a personal computer user. It's essential to have reliable data recovery software available in case of data loss. While Disk Drill has been a popular choice for a long time, there are other options available in the market.…
- Pen drives are one of the most popular portable storage devices available today. They are small, lightweight, and easy to use, which makes them ideal for carrying data around. However, like any other storage device, they are susceptible to data loss due to various reasons, including accidental deletion, virus attacks, or physical damage. Losing important…
RecoverXDataFor windows
Best and Easiest data recovery software
$59.95
$59.95
Scene
Hot Articles
- Microsoft Windows File Recovery with RecoverXData
- How to Recover Deleted Dashcam Footage for Tesla?
- How to Recover NTFS Partition?
- Micro SD Card Data Recovery: Restore Files with RecoverXData Easily
- How to Recover Videos from DJI Drones? (Step-by-Step Guide)
- RecoverXData v3.0 Update: Everything You Need to Know
- Recovery of RAW Pictures from SD Cards Using Windows
- Western Digital Data Recovery Software: How to Recover Lost Data?
- How to Recover InDesign Files on Windows?
- Hitachi HDD Recovery Tool: Recover Lost Files Quickly and Safely